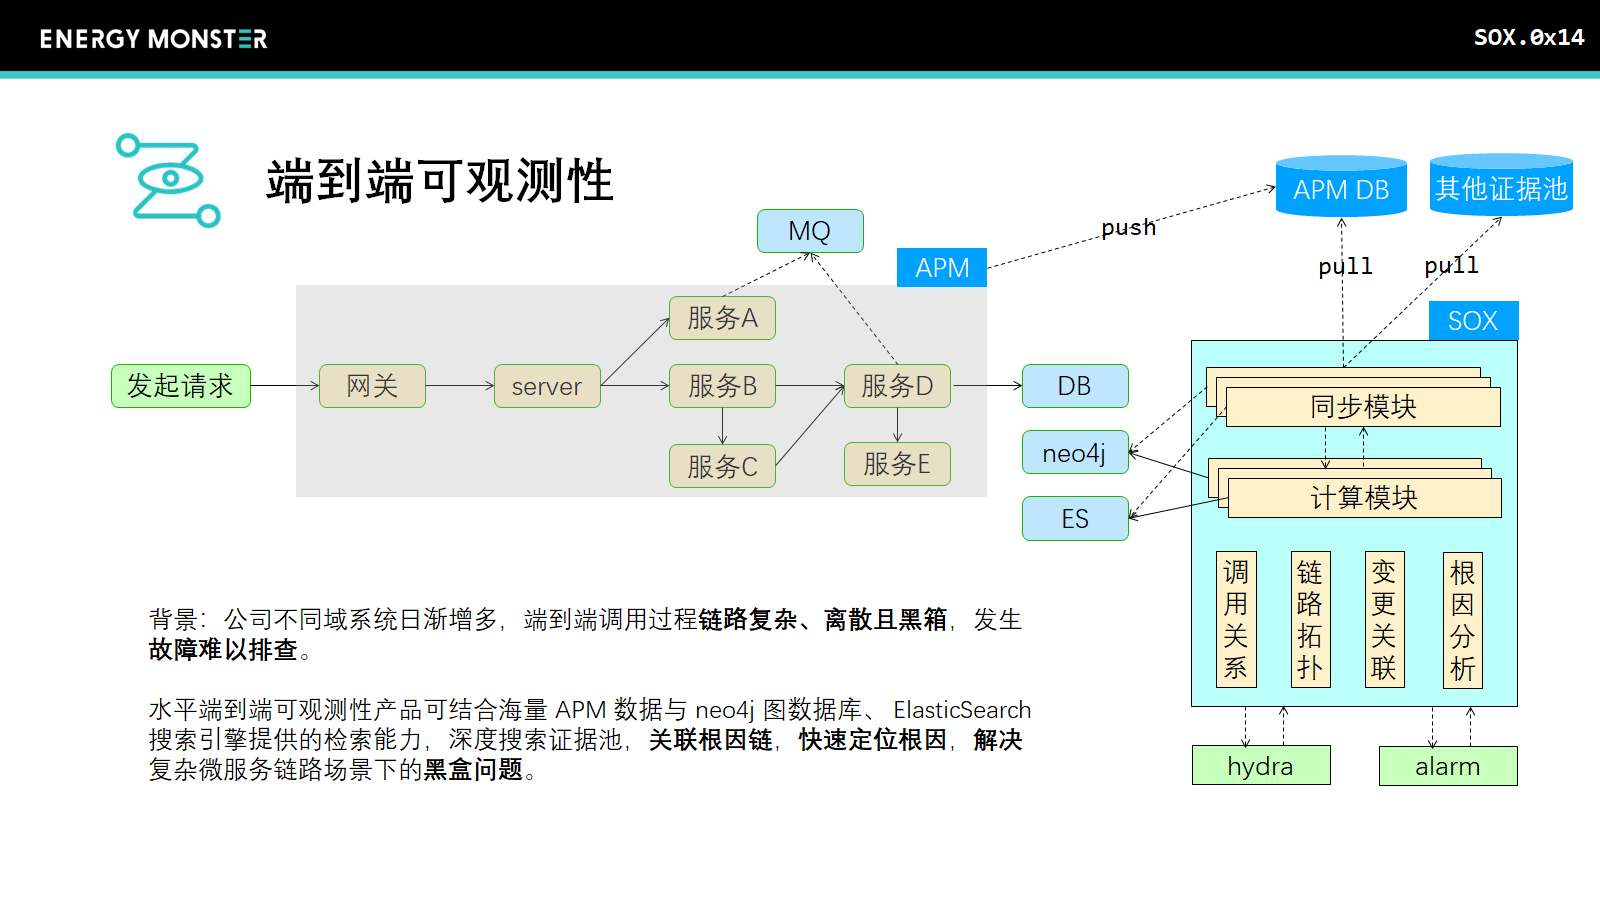
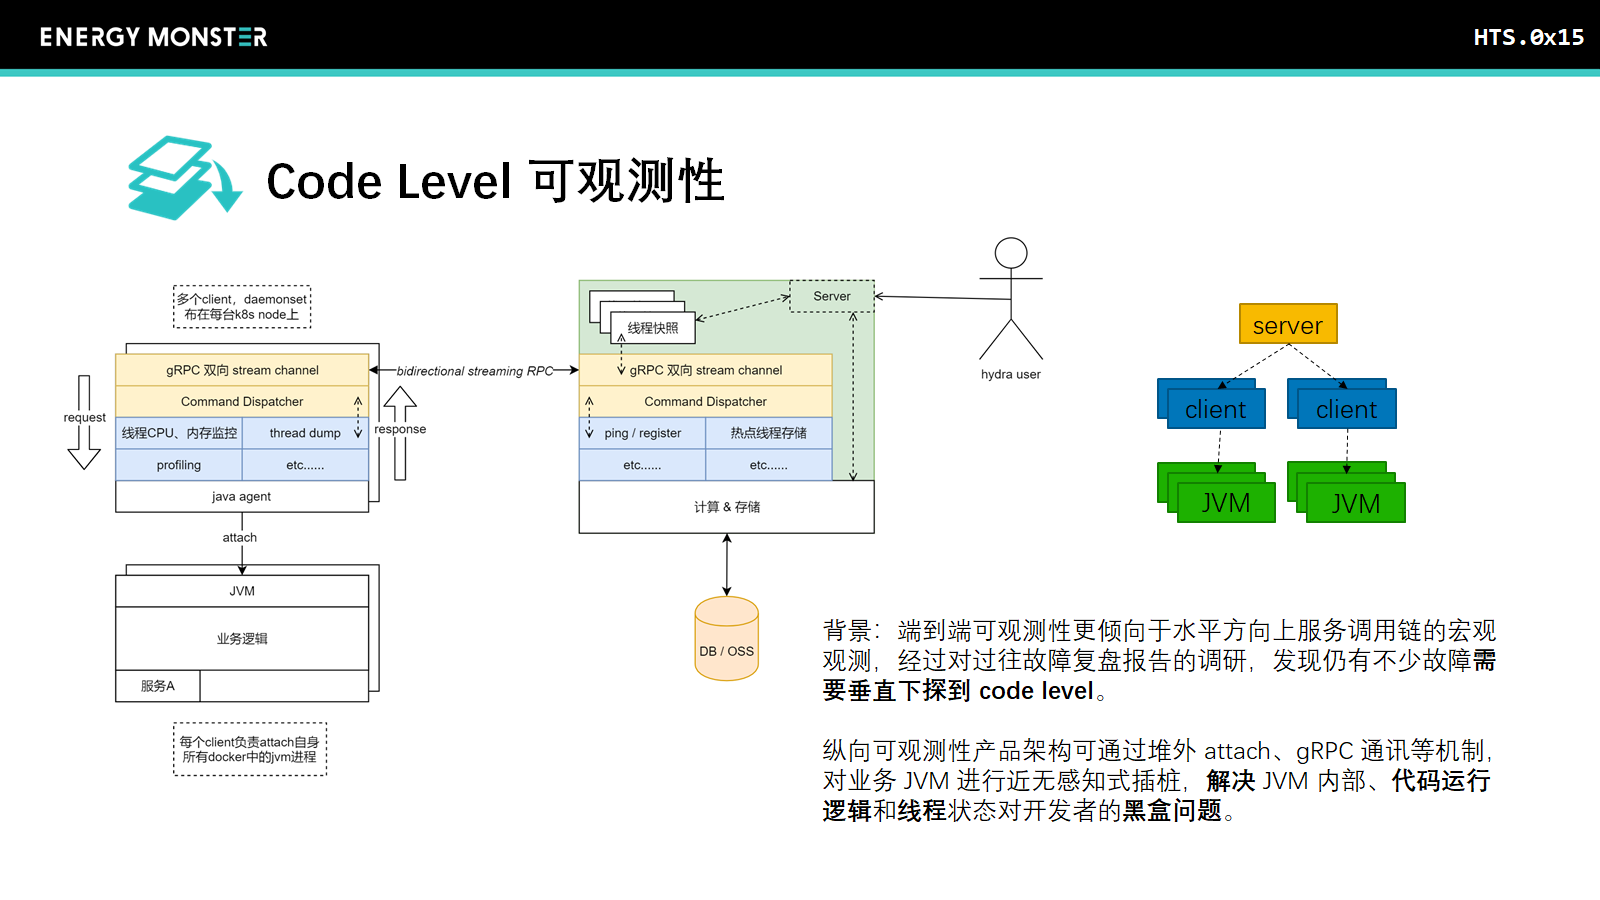
可观测性(Observability)的水平与垂直架构设计


对于一些底层业务系统,同步信息表填充基本信息的操作比较常见,过去的做法多为跨服务同步基础信息表到当前业务表并持久化,需要时join基础表填充字段。这里设计一个简单的CacheService,以内存缓存的方式实现以下功能:
Cacheable,从外部系统接收的数据结构实现转换方法,处理成系统内需要的结构T:
/**
 * @author sunyongfei
 * @date 2022/3/28
 */
public interface Cacheable<T> {

    /**
     * 获取缓存key
     * @return
     */
    String getCacheKey();

    /**
     * 获取缓存值
     * @return
     */
    T getCacheValue();
}
CacheService,单个缓存维护逻辑,可能从不同的数据源同步,统一约束行为
/**
 * @author sunyongfei
 * @genertic T: destination target class
 * @date 2022/3/28
 */
public interface CacheService<T> {

    /**
     * @PostConstruct needed in actual impl bean,
     * if you want to add annotation in the interface, use abstract class instead.
     */
    void initCacheFromDB();

    /**
     * refresh cache
     */
    boolean refreshCache();

    /**
     * refresh single cache item
     */
    boolean refreshCache(T t);

    /**
     * get cache by key
     * @param cacheKey
     * @return
     */
    T getCacheItem(String cacheKey);
}
使用例:
SysInfoSimpleDTO implements XXX, Cacheable<SysInfoDetailDTO>: 接收外部系统的DTO
SysInfoServiceImpl implements XXX, CacheService: 自定义逻辑
SyncServiceImpl: 公共逻辑,如简单的定时任务同步
@Resource
private List<CacheService<?>> cacheServices;

@Scheduled(cron = "0 0/5 * * * ?")
public void refreshCache() {
    if (CollectionUtils.isNotEmpty(cacheServices)) {
        cacheServices.forEach(CacheService::refreshCache);
    }
}
其他逻辑略
Jorges Luis Borges, 博尔赫斯
I offer you lean streets, desperate sunsets, the moon of the jagged suburbs.
我给你贫穷的街道、绝望的日落、破败郊区的月亮。
I offer you the bitterness of a man who has looked long and long at the lonely moon.
我给你一个久久地望着孤月的人的悲哀。
I offer you my ancestors, my dead men, the ghosts that living men have honoured in marble: my father’s father killed in the frontier of Buenos Aires, two bullets through his lungs, bearded and dead, wrapped by his soldiers in the hide of a cow;
my mother’s grandfather -just twentyfour- heading a charge of three hundred men in Perú, now ghosts on vanished horses.
I offer you whatever insight my books may hold. whatever manliness or humour my life.
我给你我已死去的先辈,人们用大理石纪念他们的幽灵:在布宜偌斯艾利斯边境阵亡的我父亲的父亲,两颗子弹穿了他的胸膛。蓄着胡子的他死去了,士兵们用牛皮裹起他的尸体;我母亲的祖父——时年二十四岁——在秘鲁率领三百名士兵冲锋,如今都成了消失的马背上的幽灵。
我给你我写的书中所能包含的一切悟力、我生活中所能有的男子气概或幽默。
I offer you the loyalty of a man who has never been loyal.
我给你一个从未有过信仰人的忠诚。
I offer you that kernel of myself that I have saved somehow -the central heart that deals not in words, traffics not with dreams and is untouched by time, by joy, by adversities.
我给你我设法保全的我自己的核心——不营字造句,不和梦想交易,不被时间、欢乐和逆境触动的核心。
I offer you the memory of a yellow rose seen at sunset, years before you were born.
我给你,早在你出生前多年的一个傍晚看到的一朵黄玫瑰的记忆。
I offer you explanations of yourself, theories about yourself, authentic and surprising news of yourself.
我给你对自己的解释,关于你自己的理论,你自己的真实而惊人的消息。
I can give you my loneliness, my darkness, the hunger of my heart; I am trying to bribe you with uncertainty, with danger, with defeat.
我给你我的寂寞、我的黑暗、我心的饥渴;我试图用困惑、危险、失败来打动你。
最近开发javaagent应用,参照jps命令引入了sun.jvmstat包下的一些工具写了些逻辑,Maven打包时确实有些tricky,很容易打包后执行时找不到sun.jvmstat包下的一些类,记录下解决过程
引入jdk内部依赖方法:定位.jar文件位置,scope设置为system引入
<!-- for jdk internal lib -->
<dependency>
    <groupId>com.sun</groupId>
    <artifactId>tools</artifactId>
    <version>1.8.0</version>
    <scope>system</scope>
    <systemPath>${java.home}/../lib/tools.jar</systemPath>
</dependency>正常maven-compiler-plugins是没问题的,但是如果要打单个包,使用Assembly Plugin或Shade Plugin直接打包会有问题,因为system scope的缘故tools.jar内的库还是打不进去,此时需要添加descriptor配置:
<assembly
        xmlns="http://maven.apache.org/plugins/maven-assembly-plugin/assembly/1.1.0"
        xmlns:xsi="http://www.w3.org/2001/XMLSchema-instance"
        xsi:schemaLocation="http://maven.apache.org/plugins/maven-assembly-plugin/assembly/1.1.0 http://maven.apache.org/xsd/assembly-1.1.0.xsd">
    <id>jar-with-all-dependencies</id>
    <formats>
        <format>jar</format>
    </formats>
    <includeBaseDirectory>false</includeBaseDirectory>
    <dependencySets>
        <dependencySet>
            <outputDirectory>/</outputDirectory>
            <useProjectArtifact>true</useProjectArtifact>
            <unpack>true</unpack>
            <scope>runtime</scope>
        </dependencySet>
        <dependencySet>
            <outputDirectory>/</outputDirectory>
            <unpack>true</unpack>
            <scope>system</scope>
        </dependencySet>
    </dependencySets>
</assembly>
保存为assembly.xml,在pom.xml的assembly-plugin插件配置段添加如下配置引入discriptor:
<configuration>
    <appendAssemblyId>false</appendAssemblyId>
    <descriptors>
        <descriptor>${basedir}/assembly.xml</descriptor>
    </descriptors>
</configuration>再执行assembly打包,可以看到打出来的.jar文件内已经包含sun.jvmstat包内的相关class,可以正常执行了
官方提供的Arthas Spring Boot Starter,以maven依赖的方式启动了arthas,attach自身进程后常驻;
以starter包为切入点查看arthas是如何进行attach和执行命令等一系列操作的
starter中的ArthasConfiguration类,指定在配置开启时加载attach.ArthasAgent并加载其init方法
init方法内的主要逻辑为启动AttachArthasClassloader:
com.taobao.arthas.agent.attach.ArthasAgent#init
if (instrumentation == null) {
    instrumentation = ByteBuddyAgent.install();
}

// 检查 arthasHome
if (arthasHome == null || arthasHome.trim().isEmpty()) {
    // 解压出 arthasHome
    URL coreJarUrl = this.getClass().getClassLoader().getResource("arthas-bin.zip");
    if (coreJarUrl != null) {
        File tempArthasDir = createTempDir();
        ZipUtil.unpack(coreJarUrl.openStream(), tempArthasDir);
        arthasHome = tempArthasDir.getAbsolutePath();
    } else {
        throw new IllegalArgumentException("can not getResources arthas-bin.zip from classloader: "
                + this.getClass().getClassLoader());
    }
}

// find arthas-core.jar
File arthasCoreJarFile = new File(arthasHome, ARTHAS_CORE_JAR);
if (!arthasCoreJarFile.exists()) {
    throw new IllegalStateException("can not find arthas-core.jar under arthasHome: " + arthasHome);
}
AttachArthasClassloader arthasClassLoader = new AttachArthasClassloader(
        new URL[] { arthasCoreJarFile.toURI().toURL() });

/**
 * <pre>
 * ArthasBootstrap bootstrap = ArthasBootstrap.getInstance(inst);
 * </pre>
 */
Class<?> bootstrapClass = arthasClassLoader.loadClass(ARTHAS_BOOTSTRAP);
Object bootstrap = bootstrapClass.getMethod(GET_INSTANCE, Instrumentation.class, Map.class).invoke(null,
        instrumentation, configMap);
boolean isBind = (Boolean) bootstrapClass.getMethod(IS_BIND).invoke(bootstrap);
if (!isBind) {
    String errorMsg = "Arthas server port binding failed! Please check $HOME/logs/arthas/arthas.log for more details.";
    throw new RuntimeException(errorMsg);
}
解压arthas-bin.zip包后通过AttachArthasClassloader加载,可以看到对应属性中bootstrap类是com.taobao.arthas.core.server.ArthasBootstrap,方法是getInstance,跳转到core中的Bootstrap类:
对应getInstance方法调了构造方法ArthasBootstrap,到这里arthas-core模块才真正起起来:
其中最重要的流程是bind方法,启动了arthas server,关键逻辑在ShellServer的初始化: